Flutter: Create Splash Screen
According to a recent survey, 50% of mobile users will stop using an app or Website that is loading for more than 3 seconds. So that you need to create the loading screen more creatively and innovative. For that reason, we used to take more concentrate on this splash screen. This article will completely tell you the reason for using the splash screen, its importance, and how to add it to your Application.
Step 1: Import Image Files
- Right-click your Filename.
- Tap “New”.
- Choose “File”.
- Enter the required name and tap “Ok”.
Step 2: Add the Image to the Created File
- Copy the image into your system.
- Right-click the created file.
- Tap “Paste”.
- Now, your image is added to this file.
Step 3: Declare the Image in pubspec.yaml
- Double click the “pubspec.yaml”.
- Here you can see the default codes.
- Find “assets”.
- Here, you see the default image code.
- Just edit it by using the following code.
CODE:
“assets:
images/flutter.png
images/icon.png”
“Images” declared above is the name of the file which you created.
“Flutter.png” is the name of the image.
Step 4: Add Packages to the Main Dart File
import ‘package:flutter/material.dart’;Step 5: Add Function
void main() {
runApp(new MaterialApp(
home: new SplashScreen(),
routes: <String, WidgetBuilder>{
'/HomeScreen': (BuildContext context) => new HomeScreen()
},
));
}
Step 6: Create Splash Screen Class
Class SplashScreen extends StatefulWidget {
@override
_SplashScreenState createState() => _SplashScreenState();
}
A stateful widget is useful when you describing a user interface you are describing can change dynamically.
Step 7: Create Home Class
import 'package:flutter/material.dart';
void main() => runApp(MaterialApp(
theme:
ThemeData(primaryColor: Colors.red, accentColor: Colors.yellowAccent),
debugShowCheckedModeBanner: false,
home: SplashScreen(),
));
class SplashScreen extends StatefulWidget {
@override
_SplashScreenState createState() => _SplashScreenState();
}
class _SplashScreenState extends State<SplashScreen> {
@override
Widget build(BuildContext context) {
return Scaffold(
body: Stack(
fit: StackFit.expand,
children: <Widget>[
Container(
decoration: BoxDecoration(color: Colors.greenAccent),
),
],
),
);
}
}
Step 8: Add Icon inside the Splash Screen
Column(
mainAxisAlignment: MainAxisAlignment.start,
children: <Widget>[
Expanded(
flex: 2,
child: Container(
child: Column(
mainAxisAlignment: MainAxisAlignment.center,
children: <Widget>[
CircleAvatar(
backgroundColor: Colors.purpleAccent,
radius: 50.0,
child: Icon(
Icons.shopping_basket,
color: Colors.greenAccent,
size: 50.0,
),
)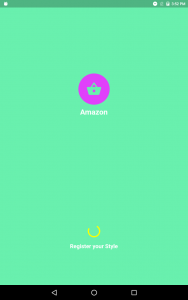
Step 9: Add Image inside Splash Screen
Column(
mainAxisAlignment: MainAxisAlignment.start,
children: <Widget>[
Expanded(
flex: 2,
child: Container(
child: Column(
mainAxisAlignment: MainAxisAlignment.center,
children: <Widget>[
CircleAvatar(
backgroundColor: Colors.purpleAccent,
radius: 50.0,
child: Icon(
Icons.shopping_basket,
color: Colors.greenAccent,
size: 50.0,
),
)
How to Create Drawer Screen in Flutter
As you all know drawer is a hidden side screen. If we tap the drawers icon it will open up a list.
How to Create the Empty Drawer
Now we just create an empty drawer screen. First, you should create a Scaffold Widget. To provide the visual structure you should add Scaffold Widget.
Class MyApp extends StatelessWidget
@override
Widget build (BuildContext context)
{
Return new Scaffold(
appBar: new AppBar(
Title: new Text(widget,title
),
Drawer: new Drawer(),
);
}
How to Add Drawer Header
For creating header Drawer Header widget is used. While using this widget you should create a child and then it allows to decorate the header.
Here I’m using BoxDecoration for decorating the box style, color, size.
drawer: new Drawer(
child: new ListView(
children: <Widget>[
new UserAccountsDrawerHeader(
accountName: new Text("Huge ", style: new TextStyle(fontSize: 20.0,color: Colors.white),
),
),
),
How to Add Items in the Drawer
For creating an item in a drawer you should use ListView. If your item contains more space. For scroll down the screen, ListView is used.
class _MyHomePageState extends State<MyHomePage> {
@override
Widget build(BuildContext context) {
return new Scaffold(
appBar: new AppBar(
title: new Text(widget.title),
),
drawer: new Drawer(
child: new ListView(
children: <Widget>[
),
),
new ListTile(
title: new Text("About us"),
trailing: new Icon(Icons.supervisor_account),
),
new ListTile(
title: new Text("Share"),
trailing: new Icon(Icons.share),
),
new ListTile(
title: new Text("Review"),
trailing: new Icon(Icons.rate_review),
),
],
),
),
Navigator
This is used for close the drawer screen.
new ListTile(
title: new Text("Review"),
trailing: new Icon(Icons.rate_review),
Navigator.pop(Review);
),
Flutter: Navigate to a New Screen
In Android terms, our screens would be new Activities. In iOS terms, new ViewControllers. In Flutter, screens are just Widgets!
let us see how to navigate the new screen.
First, create a Page which you want to navigate
- Right-click the “lib”.
- Tap “New” -> “ Dart Files”.
- Give the name like “New.page.dart”.
- Here you can create a program for the second page that is your navigational page.
Create Package in New.page.dart
import ‘package:flutter/material.dart’;Create a New Page in New.page.dart
class NewPage extends StatelessWidget {
 final String title;
 NewPage(this.title);
 @override
 Widget build(BuildContext context) {
   return new Scaffold(
     appBar: new AppBar(
       title: new Text(title),
     ),
     body: new Center(
       child: new Text(title),
     ),
   );
 }
}
Import New.page.dart File Package in Main Dart
At the main dart file enter the basic package
import ‘package:flutter/material.dart’;

import 'package:flutter8_app/new.page.dart';
Create a Class File at the Main Dart
class _MyHomePageState extends State<MyHomePage> {
 @override
 Widget build(BuildContext context) {
   return new Scaffold(
     appBar: new AppBar(
       title: new Text(widget.title),
     ),
Create ListTile in the Main Dart
new ListTile(
             title: new Text("About us"),
           ),
Declare it in Main Class
routes: <String, WidgetBuilder>{

"/a": (BuildContext context) => new NewPage("New Page"),

}
Create Navigate in the ListTile
new ListTile(
             title: new Text("About us"),
            trailing: new Icon(Icons.supervisor_account),
             onTap: () => Navigator.of(context).pushNamed("/a"),
           ),
Note: “/a” is the name I have declared in Main Class.