
Adobe Premiere Pro is one of the finest video editing software programs. This helps to edit the video, add audio and adjust the lighting to create a wonderful video to present on the screens. Most video editors make their videos lively with the help of Premiere Pro. If you are a beginner or looking for quick video editing shortcut keys, this is for you. Yes, here I’ll give you the easy and useful keyboard shortcut keys for Premiere Pro. It will reduce the time spent editing the video. So let’s scroll down the page to get your shortcut keys.
Essential Premiere Pro Keyboard Shortcuts for Editors
- Create New Project – Ctrl+Alt+N
- Create New Sequence – Ctrl+N
- Import file – Ctrl+I
- Audio Gain – G
- To Change the Clip speed duration – Ctrl+R
- To Create a Marker in Timeline – M
- Playback Speed Fast Forward – L
- Playback speed Reverse Forward – J
- Pause the Video Playback – K
- To split the sequence – C
- Selection Tool – V
- Select the Playhead – D
- Ripple Delete – Shift+Delete
- Select All – Ctrl+A
- Deselect All – Ctrl+Shift+A
- Save Project – Ctrl+S
- Undo Project – Ctrl+Z
- Text tool – T
- Export media – Ctrl+M
- Exit Project (Premiere Pro) – Ctrl+Q
Shortcut Keys Explanation for Newbies
- Audio Gain: (G) – Do you have any issues with the audio volume? For example, if your audio file has low and high volume levels, tap on the (G) to adjust the audio level.
- Clip Speed duration: (Ctrl+R) – Do you want to change the clip speed? Then press (Ctrl+R) to bring up a pop-up where you can adjust the speed and duration of your own clip.
- To create Marker: (M) – When previewing a video or audio editing in Premiere Pro, if you make any changes to a specific video part, you can use a marker (M) to easily notify the specific part that you want to edit or add something else.
- Playback Speed Fast Forward: (L) – In your editing, repeat playback will take more time. To quickly check, press (L) to increase the playback speed.
- Playback speed Reverse Fast Forward: (J) – If you want to reverse the playback speed in your video, simply press (J).
- Pause: (K) – Do you want to pause the video? Then, in the timeline, press (K) to pause playback.
- Razor Tool: (C ) – The Razor tool is used to split a clip into a timeline. If you want to quickly split a clip, simply press the (C) key.
- Selection Tool : (V) – If you want to select a specific clip or transition. Just press (V) to select the clips in the timeline.
- Select the play head: (D) – To select the play head in the timeline, press the (D) key on your keyboard.
- Ripple Delete: (Shift+Delete) – When we delete the selected clip in the timeline, a gap between the two clips is created. So you can press (Shift+Delete) to quickly remove the clip without a gap.
- Deselect All: ( Ctrl+Shift+A ) – If you have all of your files or clips selected in the Project panel, you can deselect all of them by pressing (Ctrl+Shift+A).
- Undo Project: (Ctrl+Z) – It will help to go back to the last or previous editing process. If you accidentally delete or want to undo your project, just press (Ctrl+Z).
- Text Tool: (T) – If you want to text in a project, you can press (T) to create the text easily.
- Export media: (Ctrl+M) – Do you want to export files? Then, using the keyboard shortcuts (Ctrl+M), navigate to the Export media page.
- Exit Project (Premiere Pro): (Ctrl+Q) – Once you have finished all your work or have gone to another application, simply press (Ctrl+Q) to quit the project.
Essential Premiere Pro Video Editing Tips You should Know
Move the Pivot/Anchor Point to the Center
Select a clip and hold the Ctrl key and move the anchor point to the clip center
How to Convert audio from Stereo to Mono?
In the Project bin, right-click the audio and choose Modify -> Audio Channels. Now convert audio from stereo to Mono.
How to Blur Particular Portions/Parts in Premiere Pro?
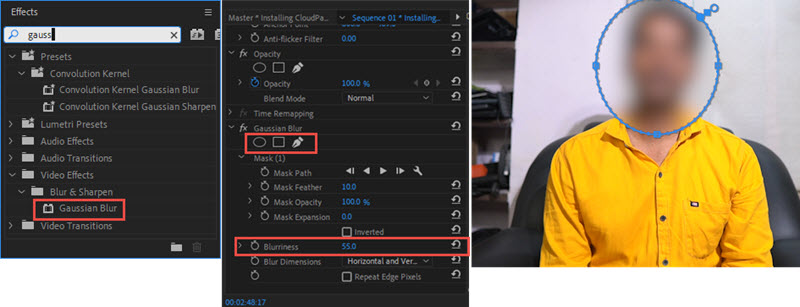
If you want to hide/blur some information in your Video like usernames, passwords, or objects,
- Go to Effects Panel. Search and Select “Gaussian Blur”. Apply this effect to the video.
- Then in the Effects Control Panel -> Gaussian Blur settings, select any one of the shapes like Ellipse or Rectangle. It will create the shape in the video.
- Adjust the shape size and position in the video.
- In Gaussian blur settings, set the “Blurriness” to 55 to 70. The shape will blur the particular portion of the video.
How to Fade-In/Fade-out Audio in Premiere Pro?
- In Timeline double-click the audio track. It will expand. Click the add/remove keyframe (It is a small circle button).
- Create 2 keyframes. Move the first keyframe to the down position. it will create a fade-in audio effect.
- Apply the same method at the end of the audio clip to create a fade-out effect.
- That's it.
How to Naming Audio/Video Tracks in Premiere Pro?
- Double-click and expand the track in Timeline.
- Right-click and Choose “Rename”. Add a name.
- Again right click and choose “Customize”. Drag and drop the “Track Name” in the button Editor to track.
- Now it will show the track's names.
How to Save Track Name as a Template?
- First name the Audio & Video tracks.
- Click the 3-column icon after Sequence Name (In the timeline) and choose “Create preset from Sequence”.
- It will create a preset file.
- Every time you create a Sequence file via New Item-> Sequence. Choose your template in a custom folder. That's all.
How to Fix Bad lighting in Premiere Pro
If you want to reduce shadows in all edited clips, just create a new Adjustment layer (In Project Bin -> New Item – Adjustment Layer) and put that layer on top of all edited clips.
- In “Effects Panel”, search and apply “Shadow/Highlight”.
- In the Adjustment Layer (Effects Controls), set “Temporal smoothing” to 1.
That's all.
Common Problems & Solutions
Problem 1: Premiere Pro Voice Over Record Button Not Working?
When I try to click the record icon in Timeline, it does not start the audio recording. The microphone icon grayed out.
Solution:-
Right-click the greyed-out Microphone Icon and select “Voice-Over Record Settings” and make sure to select the “source” and “input” microphone.
Problem 2: Can't change the audio from Stereo to Mono. “Clip channel Format” option is grayed out in Audio Channels Settings.
I decided to add fade-in and fade-out effects for the audio. When I double clip the audio track it expands and shows both left and right audio tracks. I just want a single audio track. So that I can't apply fade-in via keyframes.
So I decided to change the audio track from Stereo to Mono. In the timeline audio track, I right-clicked and selected “Audio channel”. But “Clip channel Format” is grayed out. So I can't change the audio track from stereo to Mono.
Solution:-
- Go to the project pin and select the audio.
- Right-click and choose Modify -> Audio Channels. Now you can able to convert audio from stereo to Mono. convert it.
- Delete the audio track in Timeline and drag and drop the audio from the Project bin. That's all.
Problem 3: Premiere Pro imported audio playing fast/ It Plays clip Previews too quickly(fast audio Playback speed)
When I try to play background music in Premiere Pro, the audio plays too fast. I can't hear the actual sound.
Solution:-
Changing the Audio Hardware Input Settings in Premiere Pro Preferences could solve this problem.
- Go to Edit -> Preferences -> Audio hardware and change the Default Input to “No Input”.
- Now check the audio playback.
See Also: Best After Effects Tricks & Shortcut Keys for Motion Graphics Artists
Conclusion:
That’s it, guys. These are the simplest and most wanted shortcut keys for those looking for fast and effective editing in Premiere Pro. Please let me know if you know of any other shortcuts that I haven't mentioned here through the comments section below. And please accept our heartfelt gratitude for your unwavering support.


