If you want to use Visual Studio code to create and run Python programs, this tutorial will definitely help you a lot.
The default Python IDLE app is a complicated one for beginners. But don't worry. There are a lot of third-party Python IDEs available, like Pycharm community edition, Sublime Text, PyDev, etc.
VS Code is one of the best, free and popular Python IDLEs to create and run Python apps on your desktop.
So, How do I set up Visual Studio Code for Python?
- First, make sure to download and install Python on your system.
- Then install VS code on your computer.
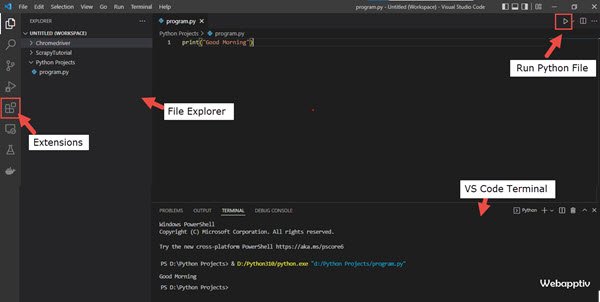
- In the VS code editor, in the left sidebar, click the Extensions icon.
- Search and find the Python extension. Install it.
- Then, in the left sidebar (explorer panel), right-click and create a new file, and name the file with the .py extension (exampleprogram.py). Now write your first program.
Example:-
print("Good Morning")6. Now click the play button on the right top corner of the VS code application.
7. It will print the “Good Morning” message in VS code terminal.
8. You can use VS code terminal like windows command prompt and install any python packages if you want using pip command.
Tips & Tricks Help You to Write Python Code Faster in VS code
you are using Visual studio code to write a Python application, you may think it does not offer many tools. VS code is not built to create Python applications. But if you want the freedom to customize & a lightweight IDE, you can choose VS code.
Here I am listing some shortcut keys, and setups to write your code faster in Visual Studio code.
Tip1: Turn selected code into a comment (VS Code Python – Single line comment)
Ctrl+/ – To comment & uncomment multiple lines
Write a multiline comment with a shortcut key
To comment on multiple lines in a Python file,
Select the code lines and press the Shift + Alt + A shortcut key.
That's it you will get multi-line comments like this
""" excel = client.Dispatch("Excel.Application")

sheets = excel.Workbooks.Open(r'D:\Chromedriver\output.xlsx')

work_sheets = sheets.Worksheets[0] """
Tip 2: Change indentation from 2 spaces to 4 spaces for Python file only
When you write code like function, loop, if-else statement, etc. You have to use 4-space indentation. But by default, Visual Studio Code applies 2 2-space indent when you press the Tab key.
To change it to 4 spaces, go to VS code Extensions.
Search and install the EditorConfig for the VS Code plugin in the VS code editor.
Now in VS Code workspace, select your Python project folder -> right click and choose “Generate .editorconfig”.
It will create .editorconfig file in that folder.
Now add the following line in .editorconfig file.
[*.py]
indent_style = space
indent_size = 4
Save the file.
Now in your python file, select a particular line of code you want to indent and press the Tab key on your keyboard. That's it. It will apply 4 spaces for the indentation.
for conten in content:
    title = conten.get_text()
    content_title.append(title)
Tip 3: Set keyboard shortcut to run python file in VS code Terminal
- In the VS Code editor, open the command palette by pressing the “F1” key.
- Type and search “Python: Run Python file in Terminal”.
- Click the settings icon in the right corner.
- For this command, click the Keybinding and add the shortcut key.
- Here I am using ctrl + 1 to run the Python file. That's it.
Extra Tip: Kite Plugin for VS Code
Visual Studio Code offers Code Autocomplete and IntelliSense. But Kite, a third-party plugin for VS Code, gives a super-fast auto-complete experience.
- First, in the VS Code Extension, search for and install “Kite AutoComplete AI Code”.
- Then open your Python file. In the VS code terminal, it will show a message like “Kite requires the Kite Copilot desktop application'.
- Click install. It will install a standalone kite application on your computer.
- Then close the open VS code. You will check if the Kite is ready for code auto-completion or not in VS Terminal. That's all.
Multi-line Editing
- Hold the Alt key and insert the cursor on the multiple lines using your mouse to get the multi-line editing.
- If you want to select and edit the same words in multi-line editing, select 1 word and press Ctrl+D. To insert the cursor in all matching locations. Use the shortcut key – Ctrl+ Shift+ L.
- If you want to insert a cursor at the end of the selected lines, select some lines and press Shift+Alt+I.
- If you want to insert a multi-line cursor above and below the current cursor, press Ctrl+Alt+Up/Down.
You can do more things in VS Code when you create Python apps like,
- Drag and drop the project folder in left side workspace.
- In VS Code, if you want to open a particular folder in a terminal like windows cd C;//Program files, just right-click the folder in VS Code left sidebar and choose the “Open in integrated terminal” option.
- You can also copy the folder or file path with the right-click command and choose “copy path” or “copy related path.
- Working with a virtual environment in the VS Code terminal is super easy.
- In the VS Code Terminal window, delete old terminal output by clicking the Trash icon.
That's it. I hope this tutorial will help you to write Python code faster in Visual Studio Code. If you know any other tips and tricks for Python VS code, do let us via the comment form.