If you want to run your python application on shared hosting (like Name cheap shared hosting), this tutorial will definitely going to help you a lot.
I am a Python programmer. Recently I learned to make Flask applications. It works very well on the local computer. But when I try to run that application on a web server, I faced a lot of issues.
So I wrote this tutorial to help programmers like me.
First, create a simple Python Flask application
Create an app.py file and add the following code.
from flask import Flask

app = Flask(__name__)

@app.route("/")
def home():
return "Welcome to Home Page"

@app.route("/<string:word>/")
def say_hi(word):
return f"Hi {word}!"

if __name__ == "__main__":
app.run()
Run the above code and you will get the output like this
Then generate the requirements.txt file
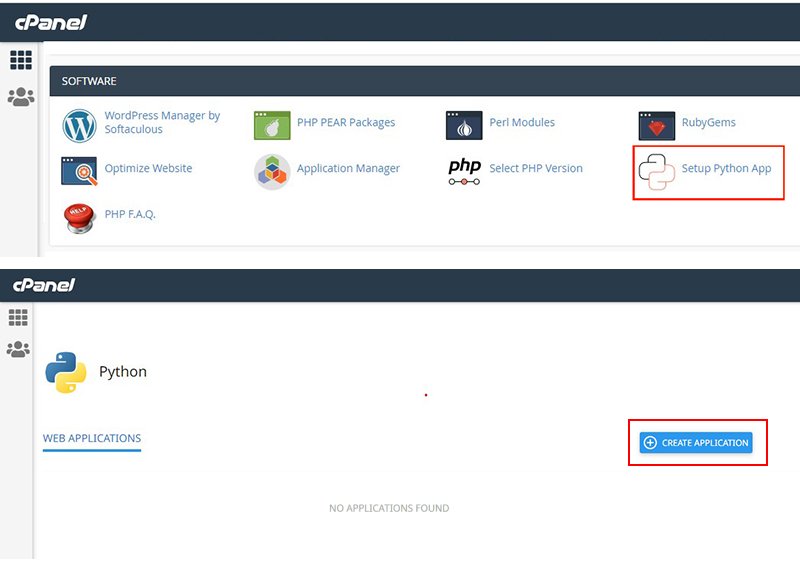
Now create a Python app in CPanel
Login into your CPanel account.
Go to the “Software” section and choose “Setup Python App“.
On “WEB APPLICATIONS” page, click the “CREATE APPLICATION” Button.
Now you have to enter the details for your Python app.
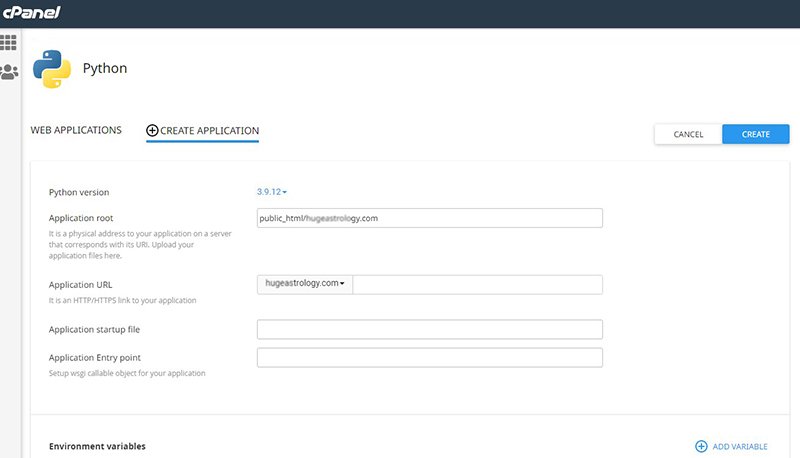
Field1: Select the latest Python version
Select the Python version to the latest version like “3.9.12” (It must. If you use an old version of Python, you may face compatibility issues).
Field 2: Set the Application root
This is the folder location, the python files go.
I am entering a public_html domain folder location like this one
public_html/geastrology.com
Note: If you just entered the folder name like “helo-app”, it will create the folder hello-app outside public_ html folder and add python files to that folder.
Filed 3: Application URL
Select your domain name.
Now leave the Application startup file field and Application entry point field empty
Now click the “CREATE” button. It will automatically add an application startup file name and application entry point.
when you navigate your website address you will see the “It works Python” message.
Now you have to upload your Python web app
On your Cpanel, go to the domain folder and upload the flask project files (app.py, requirements.txt)
Now open the passenger_wsgi.py in your domain folder.
Delete all of its code and add the following line. ‘
from app import app as application
Save the file.
Now go back to the Python app page. In Configuration Files section, type requirements.txt and click Add button.
After you done this, the “Run Pip Install” button shoul enabled.
Click the drop down in “Run Pip Install” and select your requirements.txt file.
It will install the requored modules like “Flask”. and show you the sucess message like this.
Python

Pip Install completed sucessfully.
Now click the “Restart App” button. That's all.
Whenever you face problems in your app, change the Python version and click save. Then Restart the app.
If you install the Flask App on the WordPress subdirectory, you definitely going to get an error.
This error happened due to a conflict between PHP app routing and Python app routing.
Solution:-
If you want to avoid the error, open the .htaccess file(If you don't have one, just create it).
Add the following code to your .htaccess file.
<IfModule mod_rewrite.c>
RewriteEngine On
RewriteCond %{REQUEST_URI} ^/CustomApp/.*$
RewriteRule ^(.*)$ $1 [L]
</IfModule>
Rename the /CustomApp/ with the subdirectory name you want to install the Flask app.