
I have been running a blog for more than 10 years. Recently, I bought a new VPS server from Vultr. So I have to move my blog from shared hosting to VPS hosting. 3 to 4 years before I moved my blog. But at that time, I did not know how to move all WordPress files and migrate settings. So I backed up my blog as an XML file via Tools -> Export and imported that file into a new WordPress blog. I lost featured images, image attachments, WordPress user's information, theme settings, plugin settings, and so many other things. Also, it took me 1 to 2 days to set up my blog again.
Now my blog is 10 years old, and I have experience in web development. Right now, my blog has so many blog posts, images, plugins, and themes. Recently I purchased unmanaged VPS hosting from Vultr and I want to move my WordPress site from shared PHP hosting to new VPS hosting. I googled it and found two interesting plugins, WPvivid and UpdraftPlus.
First, I tried WPvivid. It displays lots and lots of errors when I try to restore my site (maybe it can't handle big blogs and its suitable for small blogs). So I tried UpdraftPlus, and it worked like a charm.
So I created this tutorial to help other bloggers and website owners move their WordPress site/blog from one hosting to another hosting.
Step 1: Backup your Site using UpdraftPlus Plugin
Before you move your WordPress site to a new server, first backup your site using the Updraft Plus plugin.
To do that, first, install the UpdraftPlus plugin on your WordPress dashboard via Plugins -> Add New.
If you already purchased the UpdraftPlus premium version upload the plugin and install it or if you want to use the free one, search and install the UpdraftPlus plugin. Then activate the plugin.
Now go to Settings -> UpdraftPlus Backups.
In the UpdraftPlus Backup/Restore Settings page, choose Backup.
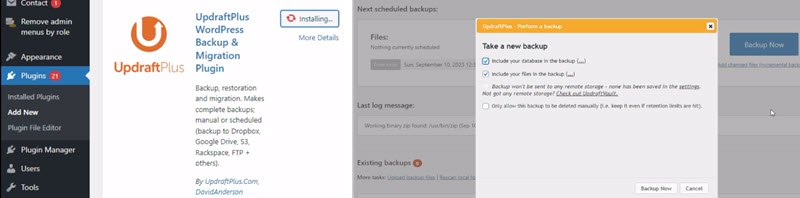
It will backup your WordPress database, themes, plugins, uploads, and others as a separate file.
Download these files on your computer.

Note: Do not forget to take a manual website backup on your old server.
If you want to test whether this backup works or not, install the XAMP server and WordPress on your computer. Then add and test this backup. If it works well, then you don't need to worry about anything.
Step 2: Change Domain DNS address for New hosting and add your domain to New Server
If you purchase a new web hosting package, they will provide new name servers. Now go to the domain name provider website where you purchased your domain name, like GoDaddy, and replace the old name servers with new ones.
Also, don't forget to add your website to the new hosting.
Step 3: Install New WordPress and Restore Files and Settings with Backup Plugin
After you add your domain name to the new hosting account, wait 5 to 30 minutes.
If you want to monitor name server changes quickly and see your new site pages using the DNSchanger.org website, add and test your site A record. Also, use free or paid VPN software like iTop VPN (here I am using the free version and free country list) and select other countries like Japan, the US or Australia to test your sites.
In your new hosting provides cPanel software, install WordPress with new credentials (it does not matter now).
If your hosting package does not cover cPanel software (It happened when you are using unmanaged VPS hosting) manually download and install the latest version of WordPress.
Now install the UpdraftPlus plugin.
Go to the plugin settings page. Find the “Existing backup” section and select the “Upload backup files” option.
Select the backup files from your local computer directory. Once it uploads all files, it will show the available files to restore, like “Database”, ‘Plugins”, and ‘Themes”.
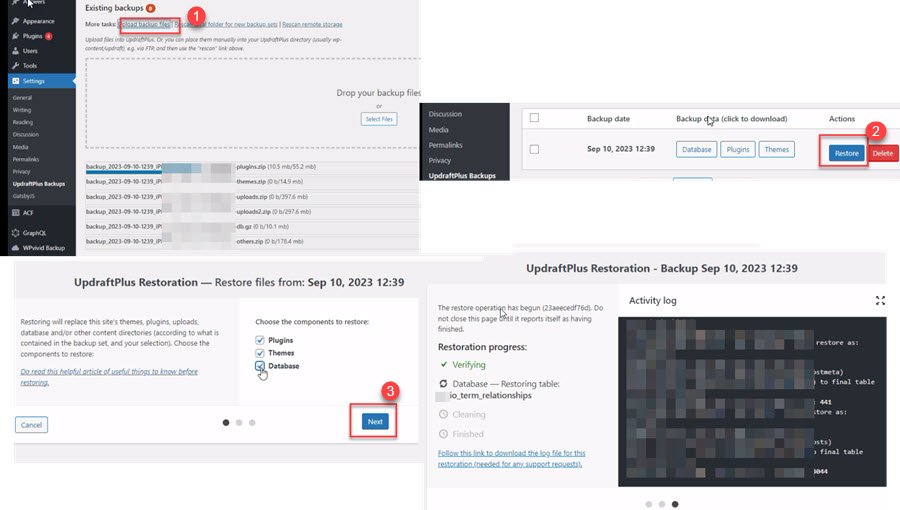
Select the “Restore” button. The UpdraftPlus Restoration window will appear. Choose a component like “Database” or “Plugins” and Click the next button. If the backups or your WordPress installation have issues, it will show. If it does not show any warnings, choose the “Restore” option. It just takes a couple of seconds to restore your files.
After it restores your WordPress database, themes, and plugin, it will show the success message. That's all.
Now check the WordPress dashboard and homepage. If everything looks the same as your old site, then no issues.
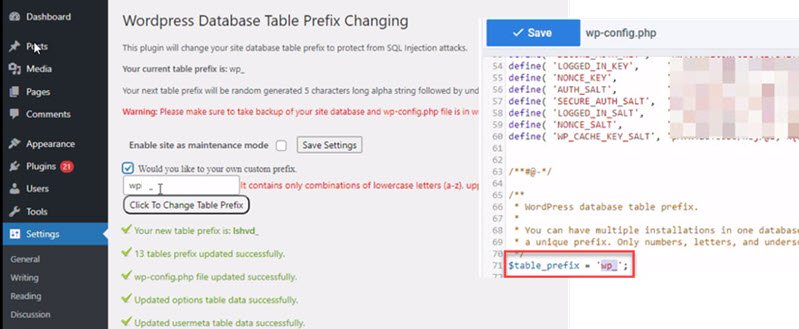
Note: If you previously changed your WordPress default table prefix, install the “Change Table Prefix” plugin.
First, change the prefix in the plugin settings. Your WordPress site automatically logout and asks you to install a fresh WordPress setup. do not install anything. Now, on your new web server, go to the WordPress installation directory. Find the wp-config.php file.
Then open the “wp-config.php” file. Search and find “$table_prefix” and change the prefix you previously used on an old WordPress site.
That's all.