
When you switch your website/blog from shared hosting to VPS hosting, you will definitely face a lot of issues. Most of the users do not know which VPS hosting they have to choose. Because there are lots and lots of best and worst VPS hosting available online. Vultr is one of the most famous and supportive VPS hosting available online.
In this tutorial, I will guide you to install CloudPanel on Vultr VPS hosting. I already created a video about that. But if you want an article version, here it is.
Step 1: Create a Vultr Account and add your Payment Method (Credit Card)
First, create a Vultr account if you do not have one. If you want a $100 credit to test the Vultr platform use the following link.
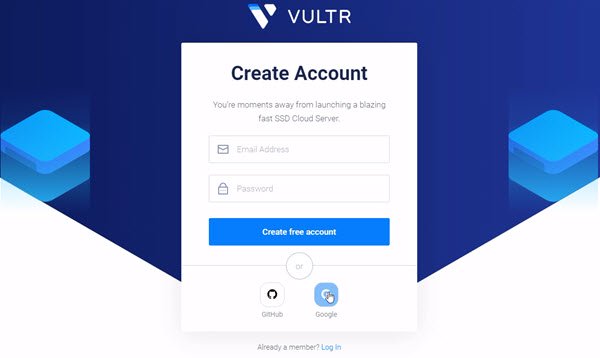
Vultr will ask you to add your credit card information or connect your PayPal in order to finish your account setup.
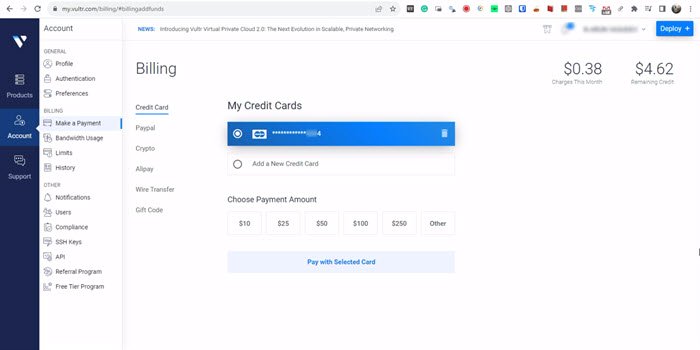
Do at least a $5 payment to verify your credit card. It will add this money to your Vultr credit balance.
Step 2: Install Ubuntu OS with CloudPanel Software
Now we have to create a server instance. Server Instances are just like containers. Each time you create an instance, it will allocate a separate space, like 50GB. RAM and processor. One server instance is enough to install Ubuntu OS and CloudPanel software. You can install unlimited sites in one server instance.
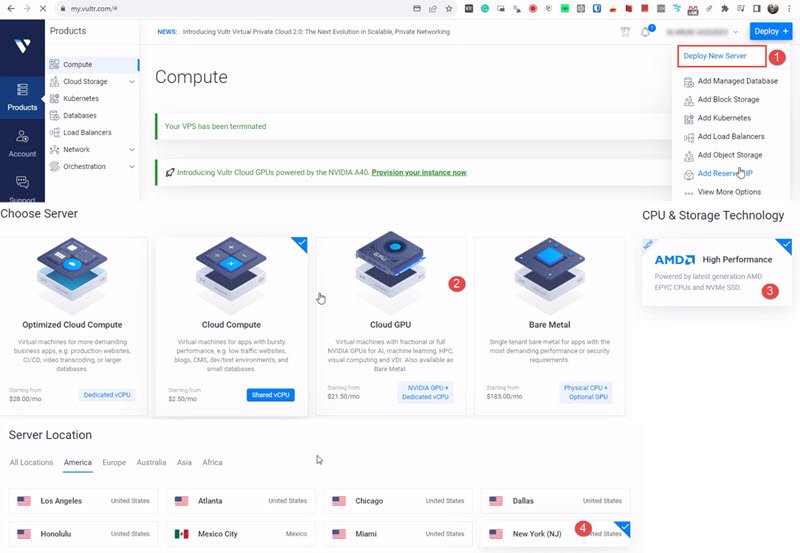
In your Vultr dashboard, navigate to the Products -> Compute menu.
Press the “Deploy +” button which will located at the top right corner of the dashboard screen. Then select the “Deploy New Server” option.
My Configuration for a VPS hosting is
- Cloud Compute (Shared vCPU)
- AMD High-Performance CPU
- Server Location New York
Vultr offers various operating systems and marketplace apps.
In Server Image, select the “Marketplace Apps” tab.
If you just want to run only one WordPress blog in VPS hosting, the “OpenLiteSpeed WordPress” option is enough. It will install Ubuntu OS and WordPress on your instance without any cPanel setup.
But if you want a separate cpanel app with multiple site hosting, then select “CloudPanel2 – Ubuntu”.
This will install the Ubuntu Operation system with CloudPanel software on your server. So you don't need to worry about a separate CloudPanel installation setup after you install Ubuntu OS.

Note: If you just install Ubuntu OS and CloudPanel software separately, it's hard to set up. Because when you try to install CloudPanel software separately you will get a lot of errors and you definitely get mad. Yes. I faced this issue. I am from a Windows background. First I installed Ubuntu OS on the server. When I try to install CloudPanel software on the Ubuntu server (No graphical user Interface), I get lots and lots of kernel errors (a black screen with an error message. Can't enter a new command. Stuck in the black screen errors).
Then choose the server size you want. CloudPanel official doc suggests the software setup requires a minimum of 1 Core, 2 GB RAM, and 10 GB hard disk space.
So I chose 1vCPU, 2GB memory with 50GB NVMe hard disk space.
Auto backup is a must-feature when you handling unmanaged VPS hosting. So I selected the Auto Backup feature.
Now enter the Hostname and Server label. The server label is just for identification purposes. So you can use space, and capital letters if you want.
Do not forget to check if the monthly billing amount is okay for you. Then click the “Deploy” button.
It will create a VPS server and install the Ubuntu OS with Cloudpanel. It just takes some time. Maybe 4 to 15 minutes.
Step 3: Login to the CloudPanel Dashboard
Once it finishes the setup, the status will change from “Installing” to “Running”.
Click your server. It will display the dashboard with the server configuration option.
Now you can see the IP address of your server. Each time you create a new server in Vultr, you will get a new IP address. Copy the IP address.
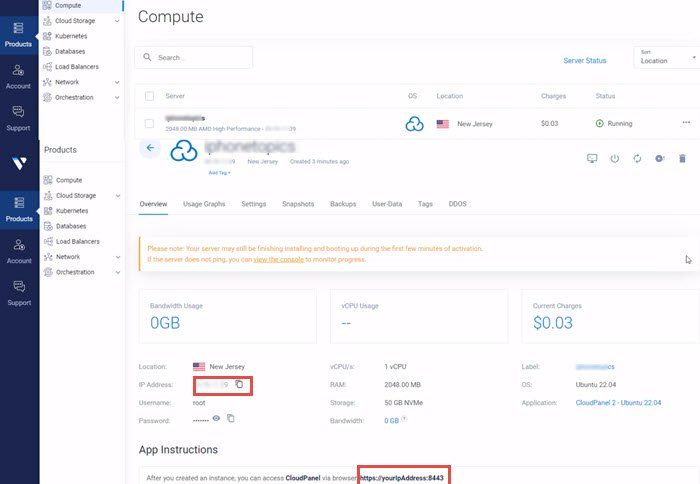
The IP address is the same for all of your apps and websites on this server. All apps will run on one IP address. Just copy the IP address.
Now you can log in to your CloudPanel using the “https:yourIpAddress:8443” address.
Note: If you enter the URL without https, you will get a “400 bad request” error. So enter the URL with Https in the browser address bar.
If you get the “Your connection is not private” error message, just click the “Advanced” button and select “proceed unsafe“.
Now create your CloudPanel admin user.
Login to Cloudpanel with the information you added. Now we have VPS hosting with a free cPanel setup.
You can use this CloudPanel with the IP address URL or create a subdomain like cp.yourwebsite.com and assign that domain to this CloudPanel.
You can add your subdomain detail in “Admin Area -> Settings“.
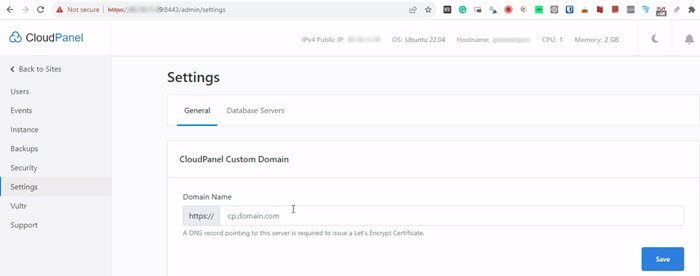
Also don't forget to add a Let's Encrypt certificate if it's required.
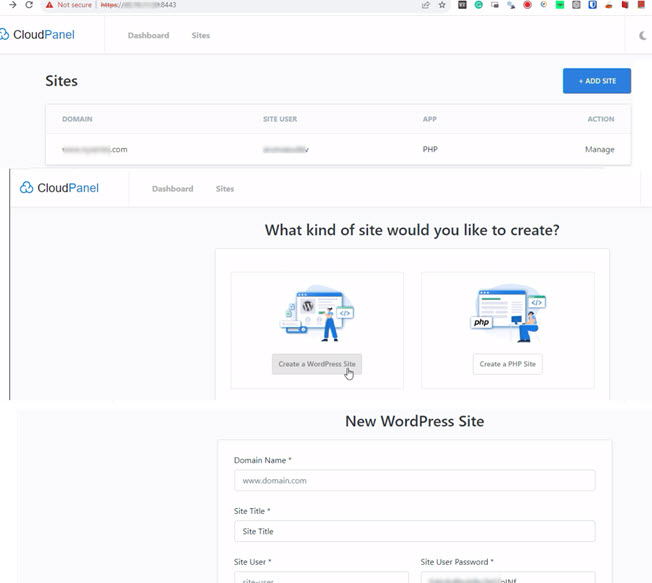
Now let's add a website to your CloudPanel account. Then we will install and check the WordPress blog.
Step 4: Change your Domain DNS and add Domain in ColoudPanel
If just add your website address in CloudPanel and install the WordPress blog, it will allow you to install the software. But when you open your website address, you can't see the WordPress Blog.
You have to add Vultr's name servers to your Domain name Name server records.
Navigate to Product Menu -> Network -> DNS.
Click “Vultr DNS Introduction”. It will give you two name servers.
Now go to your Domain name Nameservers setup. This is where you purchase your domain name. Here I am using Godaddy.
Add the name servers provided by Vultr. If you are using Cloudflare, then remove your site from Cloudflare.
Now go back to the Vultr DNS settings.
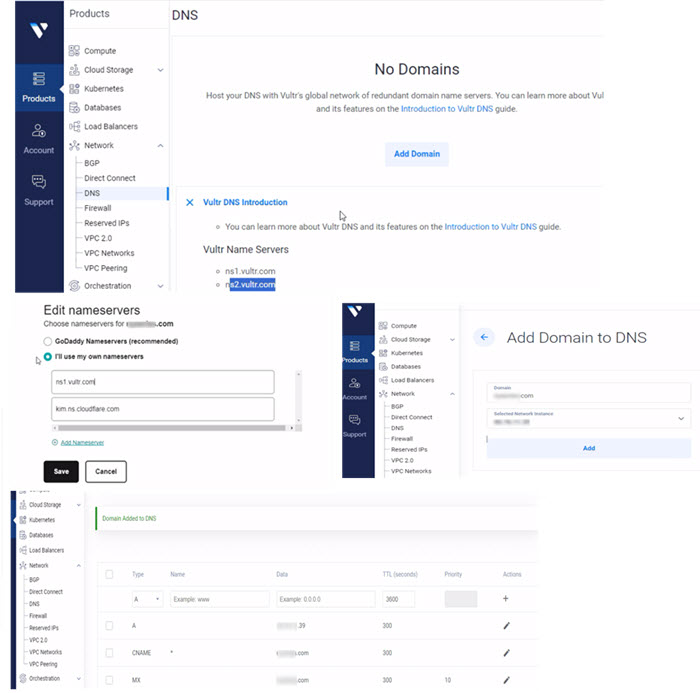
Click the “Add Domain” button. Add your domain name without “http” or “www”.
Then select your server. It will automatically create “A” and “CName” records.
- The “A” record maps your domain name to the physical IP address.
- The CNAME record indicates that a domain name is the nickname or alias for another domain.
That's all. Wait 5 to 10 minutes. Name server change will affect.
Step 5: Install the WordPress Blog
Here I have already installed a WordPress blog using CloudPanel -> Add Sites -> Create a WordPress site setup.
Step 6: Add SSL certificate
After the Name server change my site appeared without an SSL certificate.
I have to add an SSL certificate.
If you added your site to CloudPanel and installed any software and you want to install the Let's Encrypt certificate, in the CloudPanel dashboard, navigate to the “Sites” menu and choose your site.
Go to the “SL/TLS” tab.
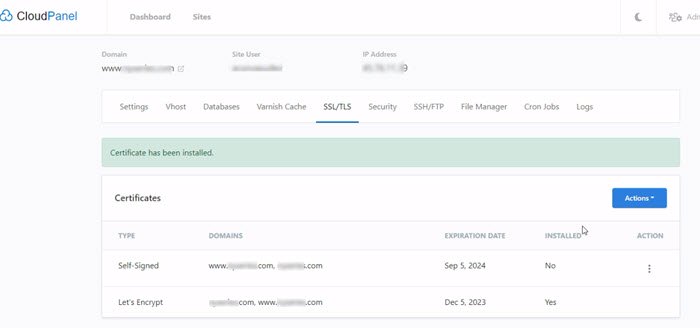
On the right side of the screen, choose”Action” and select “New Let's Encrypt Certificate”. Just click the “Create and Install” button. It will install the SSL certificate. I read the documentation that says Let's encrypt automatically and renew this certificate every year. So we don't have to worry about that.
After a few minutes later my site appeared with an HTTPS SSL certificate.
The website speed dramatically increased and it got a good score in the Google page speed test. That's all.